
Manufacturing Management
- May 30, 2024
- 25 min read
Updated: Nov 27, 2024

Manufacturing Order is a management page for creating and querying manufacturing orders and schedules.

1. Active MOs
This screen is used to search manufacturing orders in progress. You can use different search conditions to search such as Source OrderID. The production order and packaging order can be found at the same time and display the planned and completed quantities.


2. Draft MOs
This screen is used to search for manufacturing orders in draft status. The initial state of the order is draft, so if the order is generated from Manufacturing Order/Scheduling screen, it will be redirected to this screen.

3. MO Edit
The following chapters will introduce the production order editing screen. The types of orders in the system are divided into production orders (General) and packaging orders (Packing). The following figure will use a manufacture order as an example.
At the order head, you can view the source order ID and production volume status, and have buttons of deletion and automatic approval.

There are several tabs below

3.1. MO Summery
This tab mainly displays the summary of the manufacturing plan and the final outputs

3.2. Print
Here you can design reports that require printing Manufacturing orders. They have not yet been designed.

3.3. MO Process/Formula
You can check the manufacturing process and related Process Formulas here.
Click tab “MO Process/Formula”


3.3.1. MO Process/Formula
This tab displays the manufacturing Process Action, Process Drawing No, Machine Warehouse, and Machine ID.

There are shown input and output for each process formula

MO Process Formula get from “Inventory Item Process Formula”
MO Process Formula, Formula Qty of each item input and output
Formula Qty of each item input and output = (MO Qty * Item Process Formula Qty of each item input and output) / MO Economic Qty.

Item Process Formula Qty of each item input and output :
Open Item: Click “Item No”. Click tab “Costing/Pricing”

You can go below to check quantity of “Item Process Formula”

MO Economic Qty, if left blank, it will be calculated as 1

In addition, if the manufacturing process formula is set to a item assembly, must be replaced by actual input item here, otherwise the manufacturing order cannot be approved to be active.


Available machines can be selected in the manufacturing process details. This setting is based on the basic item fomula (tab:Costing/Pricing).
Click "Detail" to view available machines

In the available machines, the default is to bring them in from the basic formula of item. If you need to add more, just click “Add New Machines”, or if you need to reload from the basic formula, just click “Reload Available Machines”, and they will be brought in the machine, machine rate, machine rate unit.

Set available machines
In the item edit screen, click tab "Costing/Pricing"

Click on Detail in “Process Action” to view available machines

The machine rate and rate unit created here are brought in from the machine settings.

Button introduction
Return to MO Process/Formula, in MO Process there are 6 buttons:

+Reload Process Action
If user change basic data: change anything at item process formula after create MO, user can we use button “Reload Process Action” to calculate and update data from Item process formula to Mo Process Formula, from item Process to MO Process.
For example: I created MO: P19070003

Before click button “Reload Process Action”
Take changing the formula quantity as an example. This quantity has been manually modified before reloading the process.

After click button “Reload Process Action”

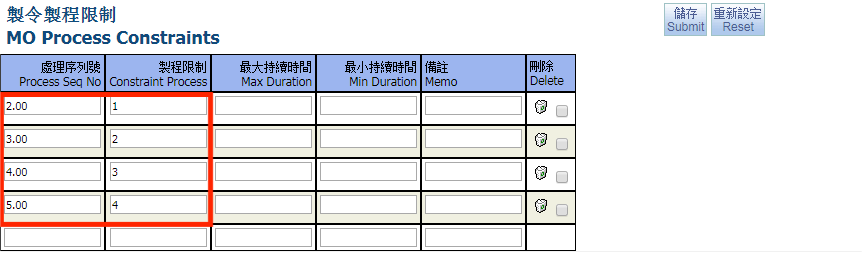
+Create MO Constraints

We don’t have MO process constraints. Click button “Create MO Constraints” to create MO constraints”.
Automatically generate process constraints setting values according to the process constraints field settings, that is each process has dependencies, and you must wait for the previous process to be completed before starting the process. This function is suitable for when the manufacturing order has multiple processes.

After creating MO constraints, you can go to the relevant screen to query

+Calculate PL Start/End Date

Logic of calculate PL Start/End date:
Max(Machine Available Date, User input, Previous MOProcess PL End Date)
Get the nearest date in 3 date: Machine Availale Date, User input, Previous MOProcess PL End Date
PL End Date = PL Start Date + ((Machine Time + (Lead Time*60))/MachineCapacity
Machine Time = MOProcessFormula.OutPutQty / (MachineRate * Production Ratio)
Ratio = Input Ration/sum of Input ration of process
MOProcessFormula.OutPutQty

Machine Available Date

Lead Time

Production Ratio

Or you can set it up on the available machine for the manufacturing process.

Machine Capacity

If machine is already set machine capacity, then the system will take capacity from it. Check machine is already set machine capacity.

For example: MO : M19060096

After inputting planned start date of the first process, the estimated completion date and estimated start date in the process will be calculated.
Click button “Calculate PL Start/End Date”


Please refer to the following formula description:
Process 1:
Machine Time = MOProcessFormula.OutPutQty / (MachineRate (if Production Ratio >0 then Production Ratio else 1) ) = 10 / (0.1 * 1) = 100
PL End Date = 2019/08/02 = PL Start Date + ((Machine Time + Lead Time * 60) / MachineCapacity) = 2019/07/29 + (100 + 32 * 60) / 480 = 2019/07/29 + 4.2 = 2019/08/02
+Reload Lot No
Logic lot No = MOrderID + Process seqno

Or you can get a lot number for a specific process

+Re-Sort Process Priority
Fill in the serial number that needs to be changed and click submit to reset the serial number.
Then click “Re-Sort Process Priority”

The serial number has been reset

+Set Draft Process To Active
If user want to change process status of all MO Process, user can we use button “Set Draft Process To Active” to change MO Process from Draft to Active. This function can convert all draft processes to active.
Before change MO Process

Click button “Set Draft Process To Active”


3.3.2. MO Formula Demands
This page displays the formula demands for MO

+MO Formula Demands:
This page displays the ordering Formula Demands

+Order Item MOPF
This screen displayed IM link with MO process >> IM2MFD in MRP formula

+PO Item MOPF
This page displays purchase order records that link the Formula Demands.

3.3.3. MO Process Reserve Qty
This page displays the reserve qty for MO

3.3.4. Create MO or PO at MO Process Formula
Create MO, click tab “MO Process/Formula”, click button “Create MO”
In MO Process Formula, the manufacturing order or purchase record of the material can be generated. According to the demand fulfillment mode set by the material, the manufacturing order or purchase order can be generated. After created, user can go to Order Item MOPF, PO Item MOPF introduced in the previous chapter.


Create MO with quantity of MO Process Formula
Create PO

Click button “Create PO” >> Create PO with quantity of MO process Formula

Before click “create PO”, need to choose “Supplier ID”. Create MO and PO at MO process is created according to the demand of MO Process Formula.
3.4. Related Routing Recipe
This page displays the recipe code settings related to the manufacturing order material number.

3.5. MO Scheduling
In MO Scheduling, can generate manufacturing process batches, which are the smallest units of scheduling. The scheduling will specify specific machines and allocate production quantities. Here are several allocation methods:
3.5.1. Multi Batch Forward
Create MO Process Batch for multi machine and calculate delivery dates.

User can choose “Ratio” or “Quantity”
+Ratio: Logic calculate PL End Date
PL Start Date = Max(Machine Available Date, User input, Previous MOProcess PL End Date) >> Get the nearest date in 3 dates
PL End Date = PL Start Date + ((Machine Time + (Lead Time*60))/MachineCapacity
Machine Time = (MO Process Formula.OutPutQty * Ratio) / (MachineRate * Production Ratio)
Ratio = Input Ration/sum of Input ration of process
For example:

Machine: F-B2: input ratio = 1
Machine: F-1K: input ratio = 2
Machine: F-1A: input ratio = 2
>>
Ratio of machine “F-B2” = 1/(1+2+2) = 0.2
Ratio of machine “F-1K” = 2/(1+2+2) = 0.4
Ratio of machine “F-1A” = 2/(1+2+2) = 0.4

Create 3 batch for process 1:
Batch 1: machine ID = F-B2
Batch 2: machine ID = F-1K
Batch 3: machine ID = F-1A


MO Process Batch Formula: Qty of Input/Output = MO process Formula Qty * Ratio
MO process Formula Qty

Batch 1:
Input = MO Process Formula Qty * Ratio = 533.5 * 0.2 = 107
Output = MO Process Formula Qty * Ratio = 500 * 0.2 = 100
Batch 2:
Input = MO Process Formula Qty * Ratio = 533.5 * 0.4 = 213.4
Output = MO Process Formula Qty * Ratio = 500 * 0.4 = 200
Batch 3:
Input = MO Process Formula Qty * Ratio = 533.5 * 0.4 = 213.4
Output = MO Process Formula Qty * Ratio = 500 * 0.4 = 200
※ Calculate PL Start Date and PL End Date of MO Process Batch
PL Start Date = Max(Machine Available Date, User input, Previous MOProcess PL End Date)
Get the nearest date in 3 dates
PL End Date = PL Start Date + ((Machine Time + (Lead Time*60))/MachineCapacity
Machine Time = (MO Process Formula.OutPutQty * Ratio) / (MachineRate * Production Ratio)
Machine Available Date and User input ( PL Start Date)

Production Ratio

MachineRate

Lead Time = Lead hour + lead day * 24

Machine Capacity

If machine is already set machine capacity, then the system will take capacity from it. Check machine is already set machine capacity.

+Quantity
Base on “MO Process Qty”, put “quantity” at “Ration/Qty”
For example : MO Process Qty = 500, we only create 300 in this planning.


Formula Input, output of MO Process Batch Formula = (Input Value / MPF Main Output Qty) * input/output of MPF Qty
Input Value

MPF (MO Process Formula) Main Output Qty

Or

Input/output of MPF Qty

For example: MO: P19070003
Create MO Batch with quantity = 300
The results of calculating the planned quantities of each formula are as follows:
Process Seq No | Distribution Seq No | Flow Type | Inventory Item No | Plan Qty |
1 | 1 | Input | BANMC04100FMS008AZM | 300 |
1 | 1 | Input | PPBOXSC4 | 120 |
1 | 1 | Input | PPCATSC5 | 30 |
1 | 1 | Input | PPPLTPL22 | 1.2 |
1 | 1 | Output | BANMC04100FMS008AZMB170SIFE | 300 |
Formula Input, output of MO Process Batch Formula = (Input Value / MPF Main Output Qty) * input/output of MPF
Process Seq No | Distribution Seq No | Flow Type | Inventory Item No | Input Value | MPF Main Output Qty | MPF Qty | MO Batch Formula Qty |
A | B | C | D | 1 | 2 | 3 | 4=(1/2)*3 |
1 | 1 | Input | BANMC04100FMS008AZM | 300 | 500 | 500 | 300 |
1 | 1 | Input | PPBOXSC4 | 300 | 500 | 200 | 120 |
1 | 1 | Input | PPCATSC5 | 300 | 500 | 50 | 30 |
1 | 1 | Input | PPPLTPL22 | 300 | 500 | 2 | 1.2 |
1 | 1 | Output | BANMC04100FMS008AZMB170SIFE | 300 | 500 | 500 | 300 |

3.5.2. One Batch Forward
Create MO Process Batch for 1 machine

Click tab “MO Scheduling”, sub tab “One Batch Forward”

Create MO Process Batch for one machine the same with multi machine, this have 2 type, create MO Process Batch with ratio or Quantity
If we use type “Ratio” >> Ratio = 100% = 1, because we create 1 MO Process Batch for 1 machine
If we use type “Quantity” >> The user enters the quantity into the system, but quantity not allow is greater than the MO Process Qty
Formulas and methods are like creating multiple Batch >> Please see “Multi Batch Forward”
3.6. APS Simulation
This tab that you can simulate planning and scheduling, this function is still under development.


3.7. MO Process Batch
In MO Process Batch, you can view the actual machine and quantity specified by the schedule, which are generated based on the manufacturing schedule introduced in the previous chapter.

Here you can generate manufacturing transfer, manufacturing order adjustment (reporting for work), and manufacturing order product inspection order records.

3.7.1. MO Process Batch Formula
Please read part “MO Scheduling” – “Multi Batch Forward”. Formula Input/Output base on quantity and ratio when create MO Process Batch.

3.7.2. Change MOProcess Batch Quantity
When you need to change the planned quantity of the process batch, you need to go on the edit screen of the order batch.
Click button “Detail” at each MO Process Batch.

Fill in “Changed Planned Qty” and click “Chang MO Batch Qty and Recalculated Planned End Date”, for the calculation formula, please refer to the MO Scheduling in the previous chapter.

The system will auto recalculate “MO process Batch” and “PL start Date – PL End Date”
Formula calculate “MO Process Batch formula” and “PL start Date – PL End Date”: the same with create MO Process Batch for multi machine “Multi Batch forward”
Please read formula calculate “MO Process Batch formula” and “PL start Date – PL End Date” at “MO Scheduling – Multi Batch forward”
3.8. MO Order Items
This tab that you can view IM transactions related to transfer transactions.

Go to screen MO Edit, click tab “Related QA Inspection”, you can view the quality inspection records related to the manufacturing order.

You can create QA Inspection from MO Process Batch.

3.10. Related Outsourcing PO
Go to screen MO Edit. This screen can generate outsourcing processing purchase orders based on the outsourcing machines specified in the manufacturing batch.

Click tab “Related Outsourcing PO” >> We create PO Outsourcing for Virtual Machine.
According to this example, an outsourcing machine (virtual machine) has been set up, and this machine is linked to the outsourcing warehouse and related suppliers.

Click button “Create Related PO”, the screen enter to “PO Management”, tab “New Outsource PO from MO Batch”

The system will take “Process Action”, “Supplier ID”, “Manufacture OrderID” from MO process to this screen. Click button “Search”

Choose Service fee if you want to change, choose MO Order.

Pick MO Order ID. Click button “Add New PO”.


The screen will go to tab “Draft Purchase Order” after create PO Outsourcing. After searching, click "Purchase Order ID" to enter editing.

In PO items, you can see that the purchasing item number is the service item number and is linked to the manufacturing order to display the actual output item.

3.11. Warehousing Records
This screen allows you to view import/ export records related to the MO.

3.12. MO Process Constraints
After creating MO constraints, you can go to the relevant screen to query, please see chapter 3.3.1. MO process Formula

3.13. Related Email
Related emails can be viewed on this screen

3.14. Message
In this screen, you can generate messages and link to this MO for tracking.

3.15. Related File
In this screen, you can upload relevant files, usually images or text files.

3.16. MO Traveler
This table displays the MO traveler, and it can be designed in different formats and printed

3.17. Sign Workflow
In this screen, you can view the approval process currently defined for this document.

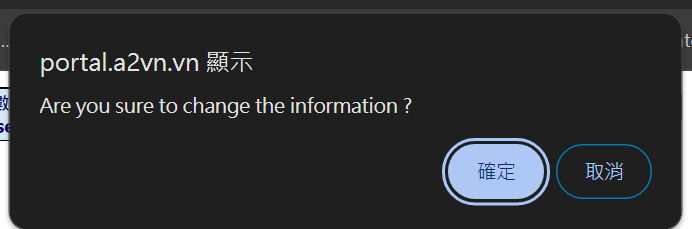
3.18. Change MO Qty
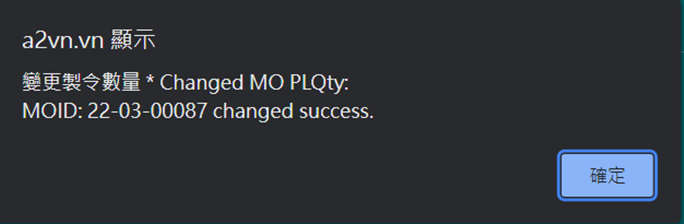
Click tab “Change MO Qty”. This tab use to change MO Qty. The system will recalculate the quantities of all process recipes of the manufacturing order based on this. The record of the changed quantity can be queried in the document change record of the manufacturing order.

Fill quantity at column “Change qty”, Click button “Change MO qty”.
Notice: Changed qty > Finished qty

3.19. Process Log
In this screen, you can view the change record of this document, which will record the change person, change time and change field.

In this screen, you can view the attachment records of the approval form. If you need to attach files, you need to enter the approval form.

3.21. Online help
On this screen, you can view online documents or help content. If you need to upload files, you need to enter the setting page of the approval process.

4. Create MO Warehousing Records
There are several ways to generate manufacturing order allocation or adjustment orders, which are divided into manual and automatic. The manual method is in the manufacturing order, and the manufacturing process batch is added directly.
Create “MO Adjustment” and “MO Transfer” at MO Process Batch or create “MO Transfer” at MO Process

4.1. Create MO Transfer
Description: this type transaction used to transfer item from warehouse A (warehouse) to warehouse B (target warehouse) and it related MO information (MorderID, MO Process seq no, MO process batch seq no). We have many ways to create MO transfer
4.1.1. Create MO Transfer from MO Process
In Manufacturing Order screen, move to tab MO Process / Formula, click button “Add New Transfer”

Appear the manual new transfer screen.
Choose the warehouse and click Submit to generate a new transfer order.


Auto Planning: auto information of MO process batch put it.
You can use the load command to quickly generate batch output items for transfer transactions, which is suitable when the work report is completed and needs to be transferred to the next process.


Detailed functions and uses of each button. You can also add item from add new items.
You can then modify the quantity or batch number information, or you can also manually add a transfer item by click Add New Items.

The screen will open the inventory or material query page. Then find item from stock or exist inventory item.

The MO Transfer can also be generated from「Personal Shift Machine or Batch Shift Machine in Production Management」. Please refer to the Production Management chapter.

4.1.2. Create MO Transfer from MO Process Batch
The transfer order generated by the manufacturing process batch is very similar to create from MO process. In Manufacturing Order screen, move to tab MO Process Batch, click button “New Batch Transfer”

For the operation method, please refer to the previous chapter: Create MO Transfer from MO Process
4.1.3. Create MO Transfer from MO Adjustment
In MO Adjustment screen, you can create MO Transfer from tab “Related MO Transfer”
There are two ways :
(1)Express MO Transfer
(2)Express MO Transfer-Specify Warehouse

Express MO Transfer
There is a button function at the bottom to quickly transfer to the next process。
if there is a single process for manufacturing order ,it will transfer quickly according to item warehouse

If the transfer is successful, the following message will appear

You can see the item in warehouse WIP101 transfer to target warehouse Hantop

Click “Inventory Item No” and check item warehouse


Click on Transaction ID HTTO24100004 to confirm that the information brought in by the system's self-generated materials is correct, and then it can be signed and closed.


If there are multiple processes for the manufacturing order, the system will decide to allocate the output materials to the warehouse of the next process based on the process limits set by the manufacturing order process. Therefore, process constraints must be set in advance. Here is a brief introduction to how process constraints are generated.


After generation, you can see the MO process showing the dependencies of each process.

Express MO Transfer-Specify Warehouse
If you want to manually specify the transfer warehouse without setting it according to the material, you can use button “Express MO Transfer-Specify Warehouse” , you need to manually select the target warehouse.

After the allocation is completed, you can see that the target warehouse becomes the designated warehouse.

4.1.4. Create MO Release
Description: This MO transfer (setting =MO release) to transfer item input (Base on MO process Formula) from item warehouse to production warehouse (warehouse of MO Process. To create MO transfer from SD, this SD need to link with MOrderID.

To quickly generate a manufacturing transfer order, search for the input materials related to the manufacturing order and select the required input materials to generate a transfer order.
Move to tab "Create MO Release" to search and pick item to create MO Release.

After generation, check the relevant shipping records of the order.

Click on the transfer transaction ID and enter to edit the batch number or quantity to close transaction.
4.1.5. Create MO Transfer Header
This tab used to create MO transfer move item output (MOPD Formula) from warehouse production to warehouse of SD. Move to tab Express MO transfer Header, Click button “Create MO Transfer”.

According to this example, the order warehouse and the shipping warehouse are different, so you can allocate.

4.2. Create MO Adjustment
Create MO Adjustment at MO Process Batch. Or you can create at Production Management, please check the chapter Production Management.
Description: This type transaction used to adjust quantity of input and output item in Manufacturing Order. We have many ways to create MO Adjustments.
4.2.1. Create from MO Process Batch

You can fill in main output item weight and others output item weight, and main output item copied, it’s not required, then submit to create MO Adjustment.

After created, you can change transaction date at header.

In tab “InventoryJournal Plan” , you can see the “Adjust Quantity” automatically brought in by the MO unproduced quantity of the Manufacturing Order

You can change the “Adjust Quantity” manually , fill in quantity and click submit

Click “Calculated MO Check-Out”, it will calculate the input quantity automatically

Click “Auto Approve” to close

If the item in InventoryJournal Plan is deleted, you can click "Load Check Out Item" to load the item automatically.


Click “Calculated MO Check-Out”, It is calculate the input quantity automatically

You can add adjustment items manually, click “Add New Items”

Pick and click “Transfer Selected Item”


4.2.2. Create from MO Process Batch Job Report – Barcode
On this screen, you can scan the batch number and automatically generate Manufacturing Orders to achieve real-time convenience.

Screen MO Process Distribution, click tab “Job Report – Barcode”

1: Is Auto Close: the system auto close MO Adjustment when create MO Adjustment, if item check out have already stock
2: Check in quantity: default value: MO Process Batch Qty
3: Batch No: Barcodes can be entered manually or scanned in

Click button “New MO Adjustment”

System will create MOAdjustment after that.


For subsequent operations, please refer to the previous instructions.
4.2.3. Create from Shift Online screen
The MO adjustment can also be generated from「Personal Shift Machine or Batch Shift Machine in Production Management」. Please refer to the Production Management chapter.

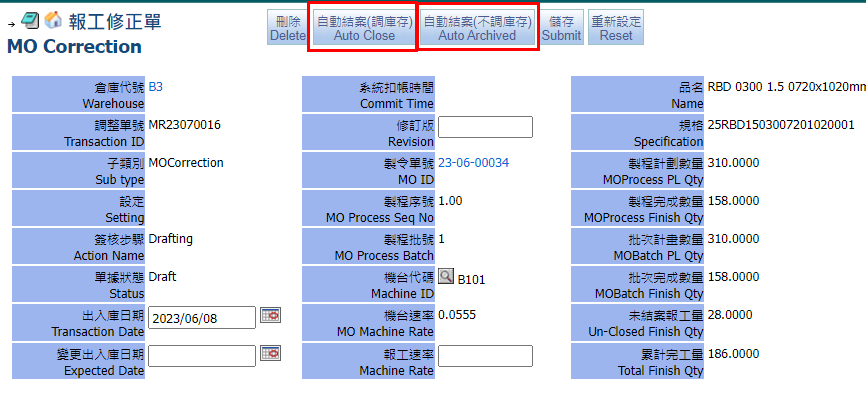
4.3. Create MO Correction
Description: this type transaction used to adjust Finish Qty in each MO batch. MO Corrections is used to amend the work order adjustment order. When the MO adjustment order has been closed and the draft status modification can no longer be restored, MO Corrections can be used to modify the work report quantity. You can choose to count inventory or not count inventory in the work report correction order. Both will count the finished quantity in progress.
Open MO Adjustment Screen, move to tab Related MO Corrections, Click Button “Create MO Correction”.

Click Button “Create MO Correction”

Fill in Adjust Quantity, calculate Unit weight or Net weight then click Submit to save

Sign to Close or Archived for MO Correction
In this screen, you can search for the manufacturing process and select the specific process change manufacturing order quantity. Since the manufacturing order may have multiple processes, the production status of each process needs to be considered. If the process status is closed, it will not be displayed. If the manufacturing order is closed, it will not be displayed. If the process is not closed, you can enter the manufacturing order change quantity. The entered change quantity must be greater than finished quantity of each process. After the change, the system will change the quantities of all processes and formulas. The function of this change is similar to changing the order quantity in MO editing. The record of the changed quantity can be queried in the document change record of the order. This function is also available in the production order editor. Please refer to the instructions for Manufacturing Order editing.

Go to Process log in Manufacturing Order edit screen to see the quantity change record

6. Order Item Production
In this screen, you can search for the manufacturing and production records related to the order.

Click tab “Order Item Production”
6.1. Search Order Item Production
You can search all detail SA (Order ID, Delivery Date, SA Quantity)

Click button “Detail” >> Open detail of SA item

Display new screen “Order Item detail”

6.1.1. Formula Tree View
Display process Formula of main item >> Process Formula Tree View

If you cannot view it, just press button to generate the tree view

6.1.2. Item stock
You can view the material inventory of Production Order Item, which is displayed according to different inventory sources

Sub tab
+Item Stock: Display stock for each warehouse by Batch No/ Location/ Unit weight of main item

+In Stock Journal: Search related transaction related with stock

+Item Stock With MO: Display stock of main item, but transaction have already linked with MOID and Process seq no

6.1.3. Formula Item stock
In Formula Item Stock, you can view the related material inventory of the production item, which displayed by different inventory sources

Subtab
+Formula Item Stock: Stock for each child item (child item: please read part “tab Formula tree view”. Group by child item, warehouse, Balance Qty)
Formula Item Stock allows you to search for material inventory related to the production material number, such as searching for work-in-progress material inventory. The search results will be displayed at the top based on the total inventory of the material in each warehouse.

+Formula Item Stock With MO: Stock for each child item (child item: please read part “tab
Formula tree view”), but transaction have already linked with MOID and Process seq no. Group by child item, warehouse, Balance Qty

6.1.4. Related MOs
For Related MOs, you can view related manufacturing orders of items, including production orders and packaging orders.

+Related MOs: For related MOs, you can view the order information.

+Related MOs Workflow: Related MOs Workflow is to sign all Manufacturing Orders.

+Related MO Process Distribution: Displayed MO process Batch of MO related with SA

+Related MO Process: Display MO process of MO related

+Related MO Process Formula: Display MO process formula of related MOs

6.1.5. Related PO Item
This screen displays purchase records related to SA and MO.

+Related PO Items: Related PO Items refers to purchasing records generated by input material requirements

+Related Outsourcing PO: Related Outsourcing PO refers to the purchase order record generated by the outsourcing process in the manufacturing order.

6.2. Search SA Item related MO
You can search SA Item related MOs like production MO, packing MO.

7. Manufacturing Resource Planning (MRP II)
7.1. Introduction to MRPII
MRP II is a function of the production plan, based on the quantity of INPUT and calculate that quantity how many (days) need to complete all the Input, since Starts date + time need to complete ( day) = end date. For example, the quantity required is 100,000 pcs, machine rate can produce 50pcs / min, complete time = 100,000 / 50 = 2000 (min)
There's one more definition of time machine can run. For example: one day the machine can operate only 8 hours (480 min)
In 2000 (min) requirements, each day can only run 480 min, the number of days = 2000/480 ~ 4.1667 days to complete 100,000 pcs with machine rate can produce 50pcs / min.
If starting date is 2023/04/01 08:00:00, the estimated completion date is 2023/04/05/ 09:20:00
There's one more definition of time machine can run like that one day the machine can operate only 8 hours (480 min) .this is “ Machine Capacity”
Machine Capacity: (on screen of Machine cell / Machine Equipment)
7.2. Create Machine Capacity
Go to Basic >> Inventory

Click tab “Equipment/Machine Cell” > “Machine Cell”, click button “search”

In the management screen, you can change the machine capacity and check the current machine availability date.

If you need to create different daily production capacities, you can first edit shifts, Workstations and Min Per Shift.

Daily production capacities can be added in the machine editing screen. If the daily production capacity is not established, the single-head production capacity will be the main one.

After editing, click Create Capacity

After the generation is completed, you can view the production capacity = Min Per Shift * Active Workstations * shift ID

Create Machine Capacity Fields Description
+Schedule Date: Date Range to decide how many days to Capacity From Which Date to Which Date
+Schedule Type
-Weekly: continuously create the Machine Capacity
-Bi-Weekly: Create Machine Capacity each 2 weeks : one week create , another week is skipped.
+Min Per Shift: Default value is coming the master area (top Area) , user can adjust it. It means how many minutes machine can operate in one working Shift
+Active Workstations: Default value is coming the master area (top Area) , user can adjust it. It means how many productivity machine can product. Usually, if you have 3 machines like “A-12”, this value will be 3
+Shifts: Default value is coming the master area (top Area), user can adjust it. It means how many shifts machine runs
Monday: it‘s a date that user wish to create the Capacity
Tuesday: it’s a date that user wish to create the Capacity
Wednesday: it’s a date that user wish to create the Capacity
Thursday: it’s a date that user wish to create the Capacity
Friday: it’s a date that user wish to create the Capacity
Saturday: it’s a date that user wish to create the Capacity
Sunday: it’s a date that user wish to create the Capacity
7.3. Machine Calendar
The machine calendar mainly displays the daily schedule number and remaining capacity in a calendar format.

Total: machine capacity of date, remain: The remaining capacity is not used up
Jobs: Active MOProcessBatch
Machines: MOProcessBatch Machines
Total: Total Machine Minutes
Used: Used Minutes
Remain: Remain Minutes

Display detail MO Batch, but status of MO Batch = Active or Online
Button “Update Priority By PLEndDate”: reorder the jobs, PL start date and PL end date base on start date (user choose) and the job order
Button “Change Priority and Recalculate”: Allows you to edit the priority order of running jobs, then rearrange the running order according to that priority

7.5. Draft/Hold MO Batch
Display detail MO Batch, but status of MO Batch = Draft or Hold

Display detail MO Process Batch

7.7. Create Machine Rate
Machine rate can be edited on the machine management screen

Machine Rate Unit can be selected, the unit options are divided into Kg or other (Unit), and the calculation is divided into per minute or hour

In the basic process of the material, it is brought in according to the basic rate set by the machine and brought into the available machines for the manufacturing process. The actual schedule is calculated based on the selection of available machines and the estimated completion date.
8. Calendar
Go to screen MO Management, click tab “Calendar”. The calendar mainly displays the daily schedule number and total remaining capacity in a calendar format.

Schedule the machines running
Jobs: Active MOProcessBatch
Machines: MOProcessBatch Machines
Total: Total Machine Minutes
Used: Used Minutes
Remain: Remain Minutes
9. Search MOs
Go to screen MO Management, click tab “Search MOs”. This tab is to search all manufacture orders with all status and can be searched according to different search conditions.

10. MO Process Management
This screen can search all manufacturing processes

Go to MO Management, click tab “MO Process Management”
10.1. Search MOs Process(By Process Subtype)

10.2. Search MOs Process
Can search the manufacturing processes based on different search conditions.

10.3. MO Process Closing Request
Close MO process base on MO Transfer setting IsClose

This requirement checks the request for a process that needs to be completed based on a manufacturing process transfer order.

After selecting the process to be closed, the system will close the manufacturing process and related manufacturing batches.


11. MO Process Batch
This screen can search all manufacturing process batches and batches of new manufacturing orders can be added

This screen allows you to query drafts, active, and online batches, as well as query batch details.

Current production status can be queried

11.2. Hold MO Batch
This screen can query the batch of orders in the suspended status.

This screen allows you to search for MOs that need to be scheduled. For scheduling methods, please refer to the MO schedule in the previous chapter.

Show orders in search results that are not currently scheduled

The arrangement can be displayed on the machine according to the manufacturing process, and a schedule can be generated after filling in the ratio or quantity.

The created schedule will be displayed in the Created MOBatch (Currently Date) below.

If you want to delete, you can click on the batch details of MO to delete it.


This screen allows you to search for manufacturing orders that need to be scheduled based on sale order, including related production orders and packaging orders. For scheduling methods, please refer to the MO scheduling in the previous chapter.
Create MO Process Batch for MO link with SA: Rule and formula: Please read part “Multi Batch Forward”


11.5. Search MO Process Batch
Search MO Process Batch is used to search all status of MO Process Batch and create Mold Transfer

11.6. MO Batch Closing Request
Close MO process batch base on MO Transfer setting IsClose


This requirement checks the request for a process that needs to be completed based on a manufacturing process transfer order.

After selecting the process to be closed, the system will close the manufacturing process and related manufacturing batches

12. Product Daily Check List
You can print a check list of products to check whether there are related problems with the product.

12.1. Search Un-Close MO Process Batch
In this screen, you can search Un-Close MO Process Batch, after selecting the MO order that needs to be checked, pick it and click submit

The screen will automatically switch to tab “Search Results”, pick MOrder ID you need to print then submit it.

After you can choose to print in two formats

12.2. The Product Daily Check List Layout
Print according to the designed report, print it and fill in the check list


12.3. The Product Daily Check List Detail
Print according to overprint ,print it and fill in the check list

12.4. Search Results
For details, please see Search Un-Close MO Process Batch

13. MO Reports
The following introduces the reports related to Manufacturing Order

13.1. Print MO Traveller
This tab is to print all MO Traveller and export report files for printing.

Show total pages 1 ~207

13.2. Prod. Sum,By(Warehouse,Machine)
This tab is to print production summary from a certain period and export report files for printing.

Fill in “Transaction Date” to Search

13.3. Prod. Det,By(Warehouse,Machine)
This tab is to print production detail from a certain period and export report files for printing.

Fill in “Transaction Date” to Search

13.4. OEE Report
This table can print the comprehensive efficiency table of the machine equipment, including the completion amount, working hours, utilization rate, etc., and can export the report file for printing.

Fill in “Schedule Date” to search

14. Capacity Setting
Go to screen MO Management, click tab “Capacity Setting”.
The setting method of this screen is the same as the Manufacturing Resource Planning (MRP II) in the previous chapter. Please refer to the previous description. Here you can set up the production of multiple machines.

This tab create Machine Capacity for all machine
+ Choose Schedule date and Schedule Type
+ Fill information at Min per shift, Active workstations and Shift
Pick machine ID and click button “Create Capacity”

The production capacity after production can be viewed on the machine,
click "Machine ID" to check


15. MO Process Formula
Display all MOrders have MO Process Formulas

16. Adjust Request
The function of this screen is similar to the MO Process Closing Request in the previous chapter. In the MO adjustment order or MO transfer orders, the head can check whether the inventory is adjusted automatically. When a transaction cannot be closed due to insufficient inventory, the supervisor can close the case in batches based on the transaction that have been checked for automatic adjustment.
Go to screen MO Management, click tab “Adjust Request”

16.1. Adjust Request
The source transaction is the MO adjustment order, pick “TO Auto Adjust” then submit it

Tab “Adjust Request”: when pick it and click button “Submit” , if item don’t have stock to close the MO Adjustment, the system will create new MO Adjustment automatically to create inventory stock for the item, then you can sign to close the transaction.
16.2. Auto Transfer Request
The source transaction is the MO Transfer order, pick “TO Auto Adjust” then submit it


Tab “Auto Transfer Request”: when pick it then click button “Submit” , if item don’t have stock to close MO transfer, the system will create a new MO Adjustment automatically to create inventory stock for the item, then you can sign to close the transaction
16.3. Search Auto Adjust Transactions
You can search the adjustment transactions automatically generated by the system to replenish inventory

17. My Approval
This screen can be used for batch approval of Manufacturing Orders

18. Process Log
Display all changes which have been changed relate MOrders

19. Job Correction
This screen is to search the job correction

19.1. Draft/Active MO Correction
Search MO correction with status = Active or Draft, group by warehouse, machine ID, Planned Qty. And has the function of batch approval to Archived (excluding inventory)

Pick transaction then click button “Auto Approve” , the system will auto approve this transaction to Archived


19.2. Search Job Correction
This screen to search all Job Corrections of MO order


20. MO Job Check-In
Go to screen MO Management, click tab “MO Job Check-In”. In this screen, you can search for output items in MO adjustment and can copy this item to new adjustment.

After the copy is completed, the screen will enter to tab "Draft/Active MO Check-In"

21. Update MR Delay Reason
This screen allows you to search for work report output records and update the reasons for delays. The system calculates delayed work orders based on the expected completion date of the manufacturing process and the work report date.
Go to screen MO Management, click tab “Update MR Delay Reason”, choose “Delay Reason”, pick choose transaction, click button “Submit” >> Update Delay Reason for MO Adjustment.

22. MO Job Check-Out
In this screen, you can search for input items in MO adjustment.
Search all MO Adjustment and the result have group by Warehouse ID, Transaction ID, Planned Qty

23. Draft/Active MO Check-In
This screen, you can search all MO Adjustment and status of MO Adjustment = Active or Draft

Button “Delete Journal Plan”: pick transaction, click button “Delete Journal Plan” >> the system will delete Inventory Journal Plan of MO Adjustment are selected
24. MO PD Down Time
This screen allows you to view the machine downtime and reasons for downtime.


You can go to MO Process Distribution to add record, select down reason then create down record. Click “MO Order ID” then open MO Process Distribution

Tab “MO Process Batch”, click detail

When down finish you need to select same reason to update end time.

You can use barcode swiping to generate shutdown records. After entering the reason, the system will bring in the start time.

System will calculate end time and down time minutes.

25. MO PD Work Time
This screen you can query to machine operating hours, including worktime and overtime.

On MO Process Distribution screen, in tab “MO PD Work Time”, you can fill in worktime and overtime

Fill in the time and click "submit"

26. Search/Print/Drawing
This screen you can search the drawings and print of the manufacturing process.

26.1. Search Drawing No
This tab is to search manufacturing process drawings

26.2. Print Drawing No
This tab is to print MO process drawings, and it can export report files for printing

27. Online help
On this screen, you can view online documents or help content. If you need to upload files, you need to enter the setting page of the approval process.
28. Manufacturing Order Filter
This tab you can setting the MO order for My Approval

First add item to personal settings, select ‘Class Type” and pick it , then click “Add Selected A2 Class Type”

For example: A2Class Type=General, it means that the MO type of MO order is general production

In Manufacturing Order Filter, these is a record, tick “Is Excluding”, MO order with A2Class Type "General" will not be displayed in tab My Approval

End.
